The following info about Accelerometers is based on the Freetronics 3-Axis Accelerometer.
Accelerometers are used to detect g-forces and gravity to give your projects feedback on acceleration and orientation.
For example, which way is up? Am I moving forwards, backwards, or sideways?
In the Robot 1 I used an accelerometer to tilt the ping sensor to always be level.
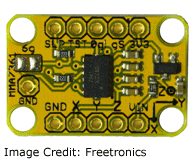 This particular module also has a Zero g output to detect if the object is in freefall. You can pick one up for about $20.
Below defines how to hook up the Accelerometer and LED to work with the code in the above tab.
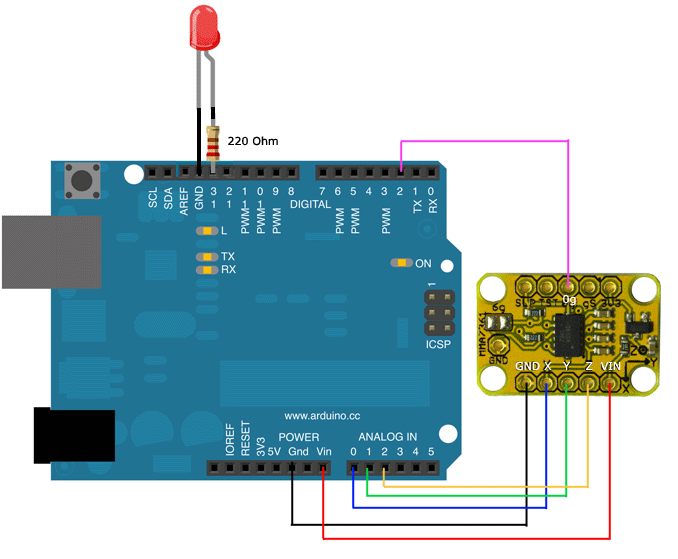
1. Hook the Ground and Vin pins up to the appropriately labelled contacts. The Accelerometer requires 3.3 volts, but it has an onboard regulator so it can be hooked up to either the 5v or 3v pins.
2. Connect the X,Y,and Z contacts to the 3 Analogue pins on your Arduino (A0 to A2). You will need to ensure you define these in your code appropriately.
3. Connect your Zero g (0g) contact to an available PIN (pin 8 in this case). This will notify us if the device is dropped. It's important to note that I have attached this output as an Interrupt with the code. This will mean that when the Zero g output is fired, the program does not miss the signal whilst it is in the middle of another process.
4. Hook up a standard red LED to the board with a 220ohm resistor.
5. See the Freetronics website for more advanced capabilities of the module including changing the sensitivity of the readings and power saving capabilities.
The following is the sketch uploaded directly to the Arduino.
It has been set up to send back to the Serial Monitor the X, Y, and Z values of the 3-Axis Accelerometer as it is tilted and moved around.
I have also added an LED which alternates between on and off every time the device is dropped. This will show how the Zero g output pin works.
NOTE: The Zero g output has been attached as an interrupt so that it does not get missed whilst the rest of the program is looping through it's other routines. Interrupt Pins are different on every board and you need to consult your specs to identify the correct Pin. In this case, I have used Interrupt 0 which connects to Pin 2 on the EtherTen.
          // identify the analog pins and other variables you are using on your Arduino

          int xAxis = A0;

          int yAxis = A1;

          int zAxis = A2;

          int axisValue = 0;

          int led = 13;

          int zeroGInterrupt = 0;

          volatile int ledState = LOW;

          unsigned long dropTimer;

        //******************************************

        void setup() {


            // open up the serial connection so that you can read the data on your screen

            Serial.begin(9600);

            Serial.println("Starting up");


            // Initialise the digital PIN that the LED is attached to as an output.

            pinMode(led, OUTPUT);


            // Turn the LED off

            digitalWrite(led, ledState);


            // Attach the 0g interrupt. The interrupt allows for the the program to sudo multitask

            // and not miss or wait for when the interrupt is fired

            // Note, this is attached to Interrupt 0 and not PIN 0. The PIN is different for every board

            // and you should consult your board specs for more info.

            attachInterrupt(zeroGInterrupt, dropped, RISING);


            // Set how long since it was last dropped.

            dropTimer = millis();

          }

          //********************************************************

        void loop() {


            // Read X,Y,Z g values and send to the Serial Monitor

            axisValue = analogRead(xAxis);

            Serial.print("X = ");

            Serial.print(axisValue);


            axisValue = analogRead(yAxis);

            Serial.print(",Y = ");

            Serial.print(axisValue);


            axisValue = analogRead(zAxis);

            Serial.print(",Z = ");

            Serial.println(axisValue);


            delay(200);

          }

          //********************************************************


          // ISR (Interrupt Sub Routine)

          void dropped()
          {


            // check that it has been at least a second before it attempts to read again.

            if ((millis() - dropTimer) >= 1000) {


                // if the module is dropped and triggers the Zero G output, set the led either

                // on or off depending upon the led's previous state.

                ledState = !ledState; // Alternate the State of the LED

                digitalWrite(led, ledState); // Turn the LED on or off

                Serial.println("Dropped");

                dropTimer = millis();

            }

          }


          // *********************************
Freetronics - 3 Axis Accelerometer : Product page of the demonstrated accelerometer. Includes code snippets, specs, and buying info.
Freetronics - Arduino : Product pages for the Freetronics Arduino Range. I have used an EtherTen for this project, but could have easily used one of the cheaper boards that did not have Ethernet capabilities.